How to Set up and Tune an Electric Violin for the First Time
You have received your brand new electric violin. It is there inside its box or even a cardboard box if you have bought it from Yamaha. Now it is your turn to play; but in order to do so, you need to perform a certain number of steps. If you buy an electric violin from a local shop, it will come all set up. But if you buy it yourself from the internet, here is the setup you will have to perform yourself. It won’t be too difficult if you follow the steps.
- Remove the paper from under the strings;
- Take the bridge and put it in its position;
- Start putting some tension on the strings;
- Tune your violin;
- Tighten the bow;
- Put some rosin on the bow;
- Plug your violin
1. Remove the paper from under the strings
Your violin has been packed in a way to prevent damage during shipping. An electric violin is a stiff and sturdy instrument in itself. The bridge and the tension of the strings are the things that can cause problems during shipping.
So you will receive your instrument with strings in place but with no tension, and cardboard to protect the fingerboard.
So you can remove the fingerboard protection and start to wind the strings slowly. But the bridge is not in place. Do not put too much tension on the strings without putting the bridge in place.
2. Take the bridge and put it in its position
Inside the case, you will find the bridge protected in a paper or plastic bag.
Now that there is a little bit of tension in the strings, you can take your bridge and install it underneath the strings in its position.
On an acoustic violin, it is a trickier process, that I have detailed in that article.
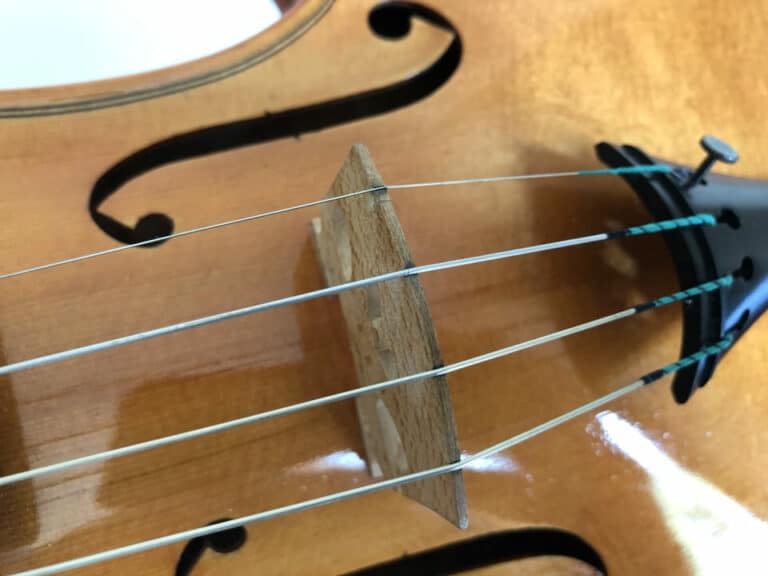
On an electric violin, the place of the bridge is well defined and there is no room for errors. There is usually a small base where the bridge will fit. The only things to be aware of are:
- the bridge is not reversible: make sure the higher side of the bridge is on the lower pitch strings side (G and D strings);
- make sure the bridge is right in the middle (that there is the exact same length from the bridge to the side of the instrument on each side of the bridge);
- lastly, make sure that the bridge is at a perfect 90° angle with the body of the instrument.
3. Start to put tension on your strings
As you will put more and more tension on the strings, check that angle because it will likely change. When the violin is tuned up alright, check one last time. If there is a slight angle, it should be towards the chin-rest and not towards the scroll.
Unwind the precision tuners on the violin’s tailpiece. But not to the point they will be able to vibrate freely. Unwind totally the screw a little bit. Doing so, you will have maximum room to tune your instrument freely in the next step. Now use the pegs to go as far as you need to.
4. Tune your electric violin
Now that there is tension on the strings, you can start to tune your instrument by plucking the strings with your fingers (your bow isn’t set up yet, remember?)
You’ve prepared the fine-tuners and went up almost all the way with the pegs. If you need to go a whole tone or more, use the pegs, if you need to adjust half a tone, use the precision tuners.
I have dedicated a whole article on how to tune your violin. But here are the most important points to consider.
You can use a tuner, they’re quite common and cheap now, such as this one on Amazon. Alternatively, you can use an iOs or Android app. If you know what you’re doing, you can still use a tuning fork (or diapason) to tune your A, and then tune the other strings by listening to a perfect fifth… Ok, that’s for further down the road!
Anyway, you will perfect your tuning when your bow is ready.
5. Tighten your bow
You tighten your bow by screwing the button down the frog, at the bottom of the bow. A screw will make the frog slide downwards and, consequently, tighten the hair of the bow. The stick of the bow has a camber; so, when it is “relaxed” the hair naturally touches the stick. The more you tighten the bow, the more the hair becomes parallel with the stick. Do not over-tighten the bow by making sure the camber still exists, and the stick never becomes parallel with the hair, or even worse, gets a camber in the opposite direction.
I have explained in this blog post what can go wrong when you tighten your bow. But basically, you do not need much force to prepare your bow. Let’s go with trial and error:
- if you do not tighten your bow enough, the hair will touch the wood of the stick when you play heavily and loud (it is preferable, just increase the tension slightly, go back to #1),
- if you tighten your bow too much, it will become unstable and you risk damaging it. Unscrew until you start to touch the stick with the hair when you play loud. Go back to #1.
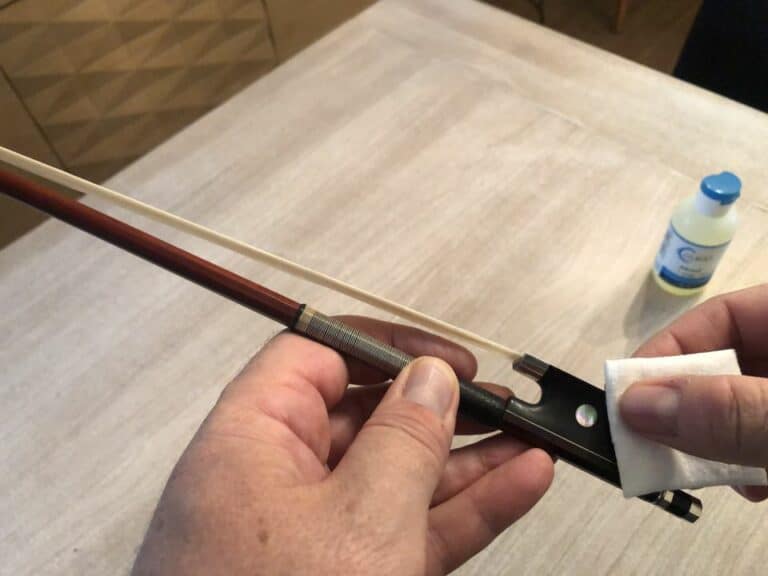
6. Put some rosin on your bow
If your violin and your bow are new, then chances are your bow doesn’t have rosin on it. That is why it doesn’t make any sound, even if it is prepared correctly. You need to put rosin on the hair of the bow. Rosin is usually included as a kit with your new violin. If it isn’t, check my recommended products page where I give some advice on the rosins I use.
Rosin is compulsory: without it, your bow won’t make any sound. Even the microscopic scales that scatter the natural hair of the bow won’t be enough to grab the strings to make a sound. Rosin isn’t sufficient either, scales help hold the rosin that grabs the strings.
Putting rosin on a bow for the first time can be rather tedious. It’s a chicken-and-egg problem. Without rosin, the hair of the bow is soft and slips on the rosin cake. It takes ages.
What I recommend is, alternatively:
- take another bow and use the rosin dust on that bow to start off your new bow. Or, if you don’t have any:
- use sandpaper on the rosin cake. Put your sandpaper sheet on a hard surface. Gather dust on the rosin cake by making circles with the cake. It will start off the cake softly. You will feel the good smell of the natural rosin. Use that dust on the new bow. Do it again. After a couple of times, your bow will be sticky enough to take rosin out of the cake without additional help.
Never use force to rosin your bow. Do not try to force rosin into the hair, but on the contrary, pick up dust lightly with the hair. You won’t damage the microscopic scales of the hair, and your bow will sound better longer this way.
7. Plug your electric violin
Now that your violin and your bow are ready, maybe check the tuning one last time. It is common for a new instrument with new strings to require tuning regularly. Check the fifths by playing the open strings together; if you’re not used to that, do it anyway to get a grab of it.
You can start to play your electric violin acoustically at first to get comfortable with the instrument at first. You will start to feel it and hear it as it is, naturally. You will be able to hear it alright, trust me.
Now plug your violin. Use a good quality cable to get a good sound, as I have detailed here.
- Put your violin volume knob to the max or almost. You want the most information possible to get to the amp,
- Adjust the volume mainly on the amp; do not play loud at first,
- Play with a bow heavy enough. Do not put your amp loud and play softly by retaining the bow.
If you want a good sound, use your bow with speed and weight. The better the sound on the electric violin, the better the sound out of the amp. But that is the subject of another article.
Now enjoy. That wasn’t that difficult, was it?