Make a Great Sound on your Violin: a Comprehensive Guide
Having a good sound on the violin is a difficult process but is completely feasible. There are so many myths and mysteries regarding that art that sometimes it appears to be out of reach. A great violin sound can be magic, miraculous. But on the other hand, a beginner’s sound can be harsh, squeaky, and prone to jokes. Every violinist wants to get the better sound possible, the quickest. So it is really important to understand the key factors and attitude to get a good sound on the violin.
To make a good tone on the violin, you first have to make sure that your violin and bow are flawless. Get a new set of strings and bow-hair. Learn the physics of violin sound. Practice your bow speed, point of contact, and bow pressure. Practice every day by playing long slow notes.
You will improve in no time. There is not one big secret that will magically give you a great sound. Buying a Stradivarius, if only you could get one, won’t even offer you the best sound, unless you understand and master the rules that follow.
Table of content
- Have your violin checked adjusted by your luthier
- Experiment and change strings
- Have your bow checked and adjusted by a bow-maker
- Change and apply rosin the good way
- Learn the physics of the violin: the Helmholtz motion
- Understand how the right and left hand should work
- Violin tone exercices
- How to get rid of that beginner sound
- Do not play for yourself
Have your violin checked and adjusted by a luthier
Now you have decided that you want the best, richest, full-bodied tone possible on your violin. What I recommend that all my students do, before spending time practicing on their instrument and shoot for perfection, is to have their violin checked.
There are many things that you can do, or must do, to take care of your violin. I have detailed them in that detailed blog post. But one thing for sure, if you want the best sound possible, is to have your violin adjusted by your violin maker:
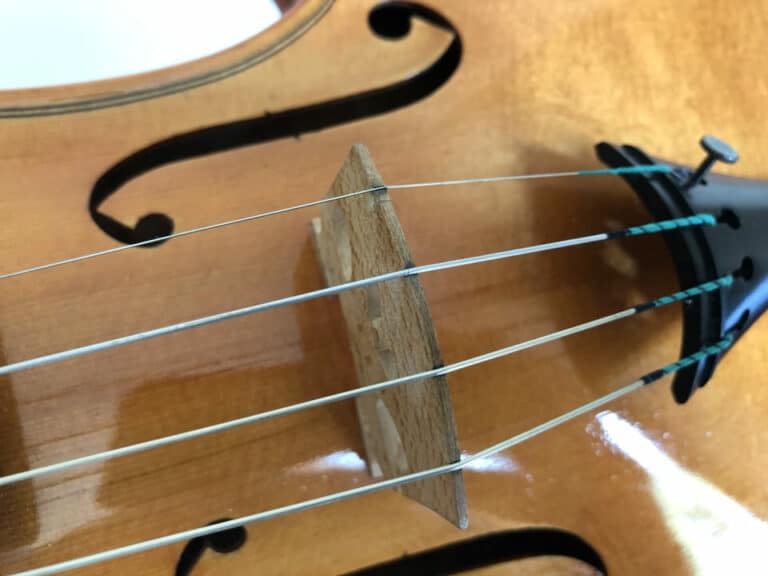
- your luthier will check the position of the bridge, and put it back to its best place,
- your luthier will check the position of the soundpost. See the soundpost as the tone control knob of your violin, if you will. Its position is crucial to have a good sound, bright, but not too much, as opposed to muffle, without edge.
- your luthier will check for cracks or un-glued parts which might vibrate one against another and create a kind of unpleasant fuzz-sound. This is not uncommon for a violin that has not been checked or restored for a long time,
- your luthier will give you advice on the set of strings that will complement best your violin according to your set-up. Some violins accept more tension (higher gauge strings), but others won’t breathe and might have a muffled sound with these. A medium gauge string set will be recommended.
Experiment and change strings
According to your luthier’s advice, change your set of strings. Strings are a wearing part of a violin. You shouldn’t try and save money by keeping your strings for too long. Especially if you want to improve your sound. Old strings lose their edge and bright sound, their richness in tone. They might even play out of tune, especially for fifth, if they stretch differently from one another. If you do the math, it is not a good idea to spend hours trying to mitigate the sound and feel of worn-out strings. Change them will turbo boost your tone and the playability of your violin on a scale you can’t imagine if you’re a beginner. I have been there. I have been trying to play fifth in tune and find out that it was impossible. My teacher at the time told me to change strings, and immediately I couldn’t believe I could play fifth with a better sound as a bonus! So I am speaking out of personal experience here. Don’t do the same mistake as me.
Have your bow checked and adjusted by a bow-maker
Change your bow hair
It is often overlooked how much the bow is important in the sound production process. Again, I have detailed all the important bullet points on what to do to have a bow in perfect condition. This is more important than many people think. Because having a good sound on the violin is not a matter of one secret…
Having a good sound on the violin is not a matter of one secret, but rather the sum of a thousand details.
Indeed, if one instrument required extreme sensitivity, it is the violin.
Go to your bow-maker and ask him:
- to check for the bow camber and straightness: this will impact the way you will able to bow straight and its stability. Both will be important later to practice your sound.
- to re-hair your bow. Bow hair is a wearing part of the bow, and it not only wears out but also ages (they are bow hairs after all and become dry and brittle.
Apply your rosin the good way
Now that you have a good bow and a new bow-hair, you should apply rosin properly. Read my complete guide on how to rosin a bow: there are many little secrets to it.
- Not too much: the sound will be harsh, and you will spread rosin powder everywhere. That will be difficult to clean off and might hinder some parts (bridge) to vibrate at their best potential,
- Not too little: the hair of the bow won’t grab the string correctly and your sound will be too thin, airy, a surface sound (see below).
- Put your rosin as if you were gathering the dust instead of forcing it in the bow hair. Apply rosin from the very frog to the very tip: don’t leave places without rosin.
Now, rosin as well shouldn’t be too old. If you’ve been using your rosin for more than a couple of years, maybe it is time to buy a new one.
Experiment with rosin: the type of rosin you use will give a slightly different sound. Dark rosins have a softer sound which can be preferred on old instruments. Natural golden rosin is brighter and grips the string more: I use them on my electric violin. Experimenting with rosin might be a long process because it takes time to apply rosin completely to your bow hair, and once it’s done, it is almost impossible to get rid of it to apply a new one. So basically, unless you try someone else’s bow, it’s not easy to try different rosins and compare on the spot.
Each of my bows has a different type of rosin. My most nervous bow has natural golden rosin, while my richest sounding and stable bow, that I use for Bach, has a dark one. I have explained in my recommended products page what types of rosin I use and why. Go and check it out.
Do not overlook the points above: they play a crucial part in making a good sound on the violin.
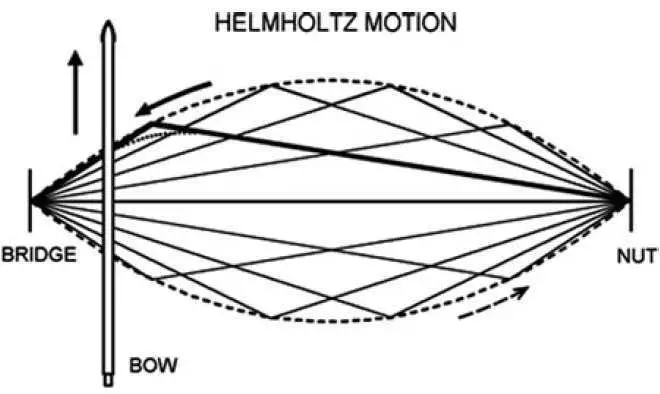
Learn how the violin produces the sound: the physics of violin is all about the Helmholtz motion
Now that your violin and your bow are both well tuned-up and in perfect condition, it is time to concentrate on producing the sound per se.
You won’t grab your instrument just yet. There is still some understanding important beforehand. The way the sound is produced on a string instrument, on the violin, in particular, obey certain laws of physics. It is completely different from piano or guitar, where the sound is produced by a sounding string that has been struck once by a pick or a hammer.
On the violin, the string is pulled at the same time as vibrating. The tiny bow-hair scales grab the string, with the sticky help of rosin, at a millisecond and millimeter level, as thousands of “micro picks” that hit the string.
If you envision that, you easily understand that, because the bow grabs the string all along the vibration process:
- the bow risks muffling it down and prevent the string from vibrating freely,
- the more you bow towards the middle of the string (fingerboard) the more likely you are to prevent the bow from vibrating,
- you might be out of sync between the bow and the string (the tiny grabbing cycles vs the string vibration) which produces a surface sound without body and edge.
I have tried to explain in simple words and introduce you to the Helmholtz motion.
This small article from Standford explains briefly and quickly the basic principle of Helmholtz researches and discoveries.
This principle has been named after Hermann von Helmholtz, a German physicist, (Wikipedia) who has discovered the physics of tone production on a string instrument.
Basically, the bow-hair produces sound in two phases:
- during a small amount of time, the bow-hair sticks to the string and pull it all the way,
- then, for a fraction of time, the string is pulled too far ad slips on the hair,
The vibration of the string alternates between these two states of sticking and slipping.
Knut Guettler, an acoustician (ph.d) and string player has given a great explanation on what Helmholtz has discovered.
The string is not making a curved line as we think we see while observing. As the bow alternates between sticking and slipping with the string, Helmholtz, with a special microscope, discovered that there is actually an angle that propagates on the string that vibrates. That angle is now called Helmholtz corner. It is the speed at which this corner propagates per cycle that determines the type of sound.
Of course, it differs on each string, notes (low, high), bow speed, and so on.
The type of sound you get is completely determined by the ratio between those two stick-slip phases. If this acoustic article from the University of Cambridge is a bit too complicated, then only trial and errors can be the way to go, but with the help of a violin teacher.
My Master seemed to have a Helmholtz sensor in his ears, which translated into him grinning or smiling according to the type of sound I could achieve on my violin.
He always insisted that a flautando like surface sound could be acceptable if it was my artistic intent for a particular piece or passage, that is to say on purpose only. An acoustic violin, with its relatively small vibration box, has to fill a hall with sound: that is why the vibration of the string has to be at its best. The type of sound that travels the furthest (as opposed to close to the ear) is determined by the natural harmonics included in the note you play. That’s why it is also important, when you work on your sound, that you try your violin in a big room or hall, with your teacher or musician friend checking at a distance.
That is why the help of a good teacher is crucial to help you with sound.
The bullet points and exercises below will all depend on the physics of the Helmholtz motion.
How to make a good sound of the violin: Point of contact, speed, weight
Now that we know the physics of violin sound production, let’s see how to grip (and let slip) that string.
The right arm has to master the point of contact, speed of the bow, and weight
All of these three aspects are in constant interplay and can’t be separated from one another.
A) The point of contact between the bow-hair and the string. It is a ratio between the bridge, the point of contact, and the length of the string. For example, if you play an open G string, the point of contact has to be further to the bridge because the whole length of the string is vibrating. However, when we play at a high position in the E string, the point of contact has to be close to the bridge because the length of the string is now really short, and, if you play close to the fingerboard, you will just prevent the string from vibrating with your bow. All good violinists have their eyes glued on the point of contact at all times.
B) The speed of the bow. Now that can depend on the tempo of the music and the type of notes you have to play. But the rule of thumb is, the faster the bow speed, the further from the bridge you play. This is really linked to the Helmholtz motion, you need to sync the Helmholtz corner with the period of the vibration. This seems technical but we can see clearly that the speed of the bow (the way we send these corners) with the pitch of the note (the period of the vibration). But only remember: the more speed, the less close to the bridge.
C) The weight of the arm. My Master doesn’t want to use the term “pressure” because it implies a downforce applied on purpose, with the reasoning that the more your press, the bigger or louder the sound. This can’t be further from the truth. The weight of the arm is a natural feeling of a free and natural consequence of a gesture. That weight has to be applied through mainly the first finger of the right hand, depending on the point of contact and speed of the bow. A stiff arm with downforce will hinder the vibration of the string. A relaxed arm with natural weight will excite the string and let the sound naturally blossom.
If there is more right arm weight with the same bow speed, the point of contact has to come closer to the bridge;
If there is less right arm weight with the same bow speed, the point of contact has to come closer to the fingerboard;
If there is more bow speed with the same weight, the point of contact has to come closer to the fingerboard,
If there is less bow speed with the same weight, the point of contact has to come closer to the bridge.
This is the magical part of tone production on the violin, the way the violin sing. Let it sing. Let it breathe. Let it be. The more you want, the more you press, the more you force, the less sound you will get. The Violin will always be stronger than you, so don’t take it by force.
Now that you know almost everything, try to play long notes while closing your eyes. Concentrate on your body and forget your violin. Concentrate on your breath: breathe slowly and regularly. Feel the weight of your own body on the ground. Feel the weight of your arms suspending from your shoulders. Feel the relaxed weight of your head resting calmly on your chinrest. And feel your right arm, heavy, sliding on the string with ease with no force except its own being there. Feel the vibration of the string naturally traveling towards your arm through your first finger. Feel the vibration of the violin throughout your whole body. This moment is magical.
Left fingers have a consequence to the type of sound
A) How left-hand fingers can stop the strings
It might seem counter-intuitive, but the way you stop the strings with the left hand has a consequence on sound as well.
It is easy to experiment, though: Just play a scale slowly while concentrating on the sound. Press your left-hand finger from the lightest possible contact to the strongest; compare sounds. You will see that after some point, light pressure is enough to get a good sound. Sometimes, pressing a bit much with a flatter finger gives a fuller sound, but this has to be used with precaution as it tends to tire the whole left hand quickly.
To get a more articulate sound, a staccato left hand as Maxim Vengerov would put it, hit the fingerboard with velocity and remove tension once the fingertip has hit the fingerboard. You will get a percussive sound that will help the string to vibrate and will define your sound if the phrase is long and legato.
Hit the string with the extreme tip of your left-hand finger at a 90° angle, almost with your nail. This will give a thin laser-sharp sound perfect for some modern passages, to give a particular atmosphere.
Left-hand pizzicato is a virtuoso trick. But it is of great help if done slightly: it will help the string to vibrate, define the attack of the note in a complementary way than the bow only. It is the kind of articulation, if done with taste, that will define your sound with precision in a room or hall. Fisher-Dieskau, the great German barytone singer, always emphasized the importance of consonant letters when singing. These left-hand articulations (slight pizzicati) are part of that consonant-type violin singing and participate in the impression of a full, understandable violin tone. Many virtuoso use that all the time.
Experiment with left-hand articulation in different ways and within different contexts. Your teacher can guide you in that respect. Do not exaggerate, of course. But used within reason, it gives to the public an indistinct impression of clarity and edge.
B) Vibrato
I will not consider vibrato in an expressive sense, here. Of course, vibrato plays many roles in violin playing. Let’s concentrate on the way vibrato helps the string to vibrate and enhance vibrations, plus vibrato helps the wave of the sound propagate in a room or hall.
For that matter, the vibrato has to be fast and of small amplitude, a Heifetz-like type of vibrato.
Heifetz pioneered that way of playing with a steel e-string and fast vibrato, he could have a loud, full, and bright sound in the biggest concert halls of the time. His sound was magical.
Yehudi Menuhin, in his autobiography, emphasized the importance of vibrato in sound propagation in big halls. These laser-sharp sounding notes could travel to the last rows of packed concert halls and amazed to the last spectator.
Violin tone exercises
The first thing to do to practice sound is to play long notes while concentrating on the sound. Try to get closer to the bridge or fingerboard and analyze the differences in sound. Try to put more arm weight and check for sound. Do this every day and if possible with outside help: a friend or a teacher to help you. Remember that the type of sound is different close to the ear, at a couple of feet, or at a distance in a big hall.
Playing scales is important because you will have to adapt all the above to different note heights that are to say string length.
Then, one important exercise is to play a note with a slow bow and then with a fast bow and try to keep the same type of sound. Then the speed of the bow won’t hinder the type of sound you want but rather be at its service.
Lastly preparing and understanding bow division is important to have a good flow: if you play quarter notes with one bow legato, then a whole note played with one bow will give you the same type of sound and bow speed. When you prepare your bow strokes, always have that in mind.
How to get rid of that beginner sound
For string instruments, the sound is the gesture. They are the corresponding parts of the same thing. The more regular and calm your bow arm, the more beautiful will be your sound.
So, a steady and regular motion of the right arm is the best way to make good progress when it comes to sound. Play notes as long as you can. Try not to shake with your bow arm. Practice that a bit every day.
Beginners tend to play too far from the bridge and with too little bow speed because they are afraid. Try to increase your bow speed: always give more bow than you thought was necessary. You will gain confidence. And a large confident gesture is the first step to get rid of a beginner sound.
Do not play violin for yourself
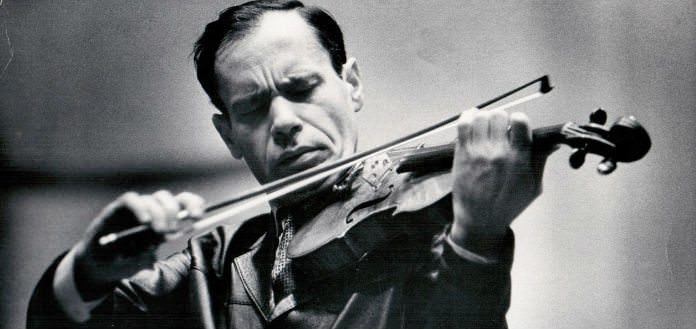
Remember that the sound you hear in your left ear is not what your audience will hear. Many of the unwanted noises, excess of treble harmonics, scratchy sounds etc. will not reach your listener and will, on the contrary, give edge and structure to your sound. Listen to how the great Shlomo Mintz plays and sounds when recorded in front of him. Look at how close to the bridge he plays. His sound is tight, always close to the limit. Even a bit harsh when listened to up close, but, oh boy, must he sound airy, precise and bright in a big hall!